Pseudo Code
Workflow Pseudo Code
You can generate the list of commands that we wish to perform on an image in the python console and when you have it working just right for the step you would like to perform you can copy and paste them into a pseudo code text file. The “Pseudocode to XML” function will be looking for files that have the file extension “.def” so it will convert all of the *.def files in the flow directory into XML.
As in the case of the macros, you can put in comment lines beginning with “comment>” and blank lines to make the code fragments more readable and easier to understand when you come back to make enhancements in a couple of months.
Each set of commands is contained by a “Step” which uses the key “step>”. The top level container is the Workflow which uses the key “flow>”. Each workflow can be specified in its own “.def” file. The “Pseudocode to XML” function will read all of the *.def files and create a single XML file named combinedFlow.xml in the myXml/flow directory.
Property / Parasite Pseudo Code
The other type of pseudo code that we need to talk about is the code for properties. The pseudo code for properties is contained in the “myXml/property” directory. The file flagProperties.xml is created by the “Pseudocode to XML” function from the flagProperties.def file. In the case of properties it only really makes sense to have one set of properties for all flows. The properties defined in the flagProperties.xml file will be the “flag” properties. You can set the property name, comments, the option values, and the default value (initial setting). The “property>” key sets the property name and contains the other property values within the XML. The other keys are “comment>”, “default>”, and “options>”. The key “flags>” with the name Control Properties is used at the beginning of the file to define the top level container.
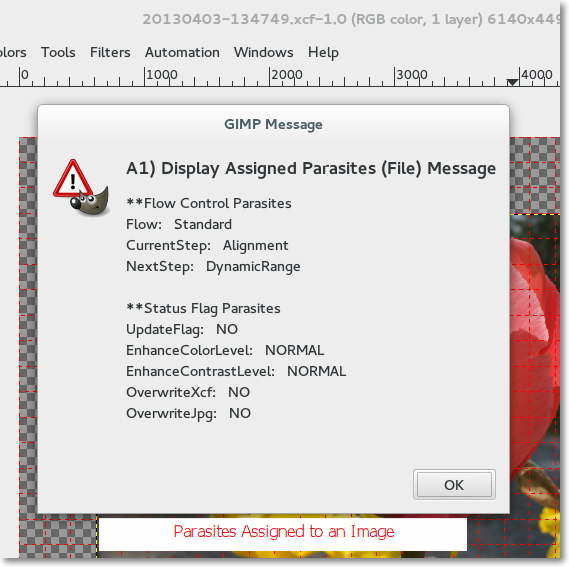
There are three properties that are assigned by the automation scripts and are not normally edited by the user or defined in the “.def” file. They are created, read and modified by the scripts. These are the flow control properties, “Flow”, “CurrentStep”, “NextStep”.
You can see all of the properties and current assigned values for a particular image using the menu function “Automation” -> “A1) Display Assigned Parasites (File)”.

Properties and Image State – Flow Control Parasites
One way to think of a workflow is as a series of states. These states are what we have been referring to as steps. As the image evolves it transitions from one state to another it moves through the workflow from beginning to end, state by state (or step by step).
The Flow Control Parasites provide a method to make each image “self aware” of its own state, which is its assigned “Flow” and “CurrentStep”. It is also aware of the next step to which it will proceed, which is determined by its assigned “Flow” and “NextStep”. The order for the steps is determined by the order they are listed in the pseudo code. When an image is updated the “NextStep becomes the new “CurrentStep” and a new “NextStep” is looked up and written to the image as a parasite.
Let’s examine the steps of the “Standard” flow example that is included with this tutorial. The steps the image will go through are:
Example – States or Steps in the Standard Flow Example
| CurrentStep | NextStep | |
| 1. | First | Alignment |
| 2. | Alignment | DynamicRange |
| 3. | DynamicRange | Retinex-Filter |
| 4. | Retinex-Filter | Sharpen |
| 5. | Sharpen | ColorAdjust |
| 6. | ColorAdjust | FINISHED |
| 7. | FINISHED | FINISHED |
The state “First” is assigned by the Jpeg to Xcf function. This step is assigned automatically regardless of the flow. The steps following the “First” step, “Alignment”, “DynamicRange”, “Retinex-Filter”, “Sharpen”, and “ColorAdjust” are assigned through the Xml representation of the flow. The Step “FINISHED” is assigned automatically when the end of the list of steps is reached.
When the images are first imported, the autoUpdate function is run to move the images from the automatically assigned “First” step to executing the first real step of the flow. When the CurrentStep becomes “FINISHED”, the image is ready to be exported by the Xcf to Jpeg function.
Status Flag Parasites
The Flag Parasites are for decision making. They will be assigned with a default value when the image is imported into a flow. The parasite whose function is flow control is the “UpdateFlag”. The value of the UpdateFlag is read to determine if an image is ready to be moved to the next state.
Flag Parasites other than the UpdateFlag can be modified or eliminated to suit the needs of your pseudo code functions. You could for example add Flags with values that determine certain layer Opacity, or determine whether certain filters will be run. There are a lot of possibilities for this powerful capability.
Automation Workflow - Summary
Running an Automated Workflow is almost trivially easy, once you have it set up to your liking. There is some work to be sure in setting up a workflow, but the reward is a consistent and apparent (obvious which steps have been run) workflow or process.
There are several things you may need to set up Gimp Preferences in order to optimize the operation.

لا ترحل قبل إضافة تعليقك هنا - نحترم الانتقاد البناء والكلام السيء مردود على صاحبة
EmoticonEmoticon